So we have Portainer setup, maybe like myself you intend on making use of Nginx Proxy Manager and have noticed that not all the containers are setup on the same virtual network, well I have 2 simple solutions for that:
Solution 1: Manually assign the network
We can manually assign a network to individual containers, if we have Portainers Dashboard open and navigate to “Containers”

Click in here and find the Container you want to change the network of, for this example I am going to my emulatorjs container,

Click into the container, which will bring you to the “Container Details” page and scroll all the way down to the end of the page, here we will see “connected networks”, out container is currently installed on it’s own default created network, note the IP address of the container is 172.16.4.2,

If we click the “Join Network” option from above, we will see a list of all the virtual networks created by our various containers, to keep things simple I am going to select the default network of our Portainer install

Click “Join Network” and our container should now be operating on the Portainer default network, and to avoid any potential complications I will leave the default emulatorjs network

As you can see we now have an IP range of 171.16.1.2, nothing was inherently wrong with the previous IP range, but if you intend on using something like Nginx Proxy Manger you need everything to be on the same network.
Solution 2: Designating a network within Docker Compose
With the 2nd option we can specify the network we want to connect to by adding:
networks:
  default:
    external:
      name: ix-portainer_default #change this to the name of your network
to our compose file, keeping with our emulatorjs, the compose file would looks as follows:
---
services:
  emulatorjs:
    image: lscr.io/linuxserver/emulatorjs:latest
    container_name: emulatorjs
    environment:
      - PUID=1000
      - PGID=1000
      - TZ=Etc/UTC
      - SUBFOLDER=/ #optional
    volumes:
      - /path/to/config:/config
      - /path/to/data:/data
    ports:
      - 3000:3000
      - 82:80
      - 4001:4001 #optional
    restart: unless-stopped
networks:
  default:
    external:
      name: ix-portainer_default
To find the name of a particular network, open up the “Networks” Dashboard in Portainer and just copy the name of whatever network you want to deploy the container on.
Macvlan
Finally, if you have the need/use for a Macvlan, I’ll document how to set that up, navigate to the “Networks” dashboard within Portainer and select “Add a Network”

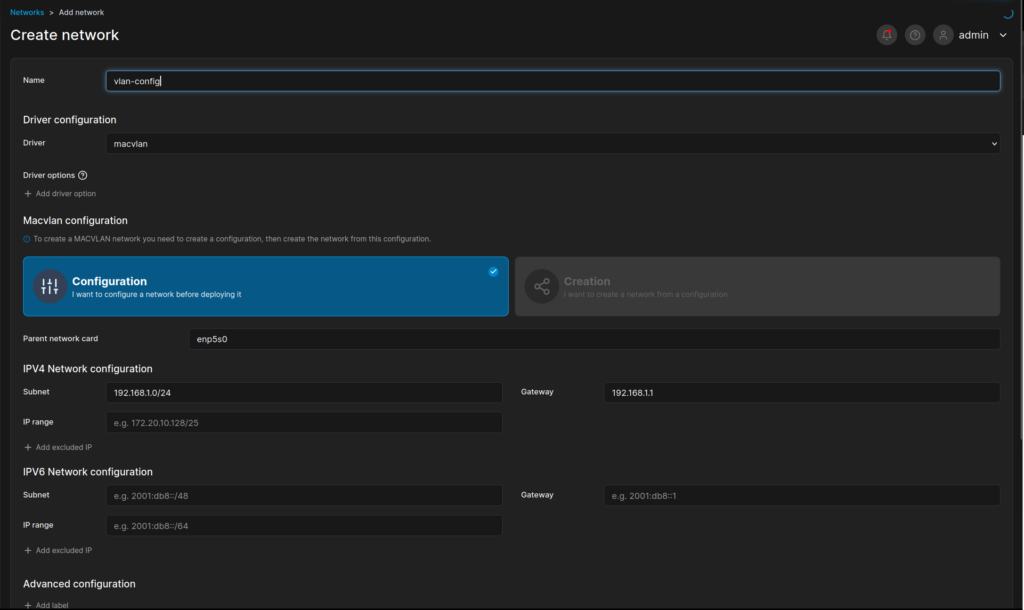
Here we fill in some fields, for Name I’ve just gone with vlan-config, as this is the initial configuration for our vlan,
for driver we select the Macvlan option from the dropdown menu, the option “Configuration” is already preselected for us,
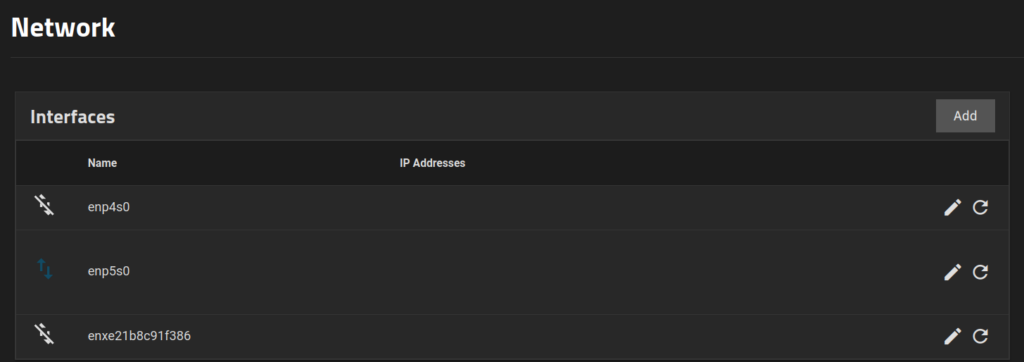
Parent Network card, I am running Truenas, and to find the network card for use we go to the “Network” dashboard in Truenas and here we will see all out interfaces:

We can see I have a few Interfaces to choose from, the top 2 (enp4 and enp5) are the network cards build into my motherboard, I am connected into “esp5s0” so that is what I used for the Macvlan creation
Subnet and Gateway are going to depend on your network is using.

Scroll down and click on “Create Newtork”, that is step 1 of getting creating a Macvlan network complete!
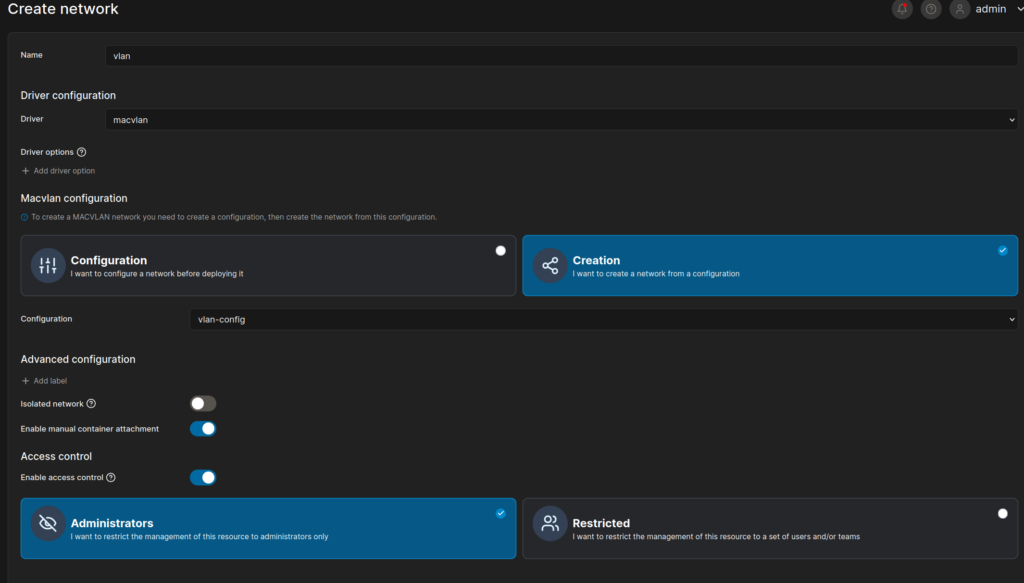
Step 2 starts out very similar, navigate back to the “Networks” dashboard within Portainer and select “Add a Network”

For Name I went with a simple “vlan”
we select the Macvlan option from the dropdown menu again, however this time instead of “Configuration” we chose the option “Creation”
Under the “configuration” drop down menu we choose our previously created “vlan-config”, toggle on “Enable manual container attachment”

Scroll to the end and press the “create the network” button, you should now have a working Macvlan.

Leave a Reply